
How Much Water?
Before setting up a watering schedule it’s important to understand your watering system and how to maintain it. This first video outlines that subject, the second video covers watering queen palms, the third covers citrus trees, and the forth takes care of everything else.
.
How Much To Water Trees In Arizona Drip System | (480) 969-8808
Drip Irrigation Components
A drip irrigation system consists of several components. Getting to know each of these parts will help you in designing the right system for your needs. For best results the components should be made by the same manufacturer- the fitting should have the same manufacturer as the poly pipe, the hole punch should be made by the same manufacturer as the emitter. This will ensure a more precise fit between all of the individual pieces.
Drip System Components
Emitters
Emitters are the most important part of a drip irrigation system. They deliver water to the plants at a slow, consistent rate. They can operate at various pressures ranging from 10-50 pounds per square inch (PSI) and can deliver between ½ gallon to 24 gallons of water per hour (GPH). For your landscape, look for emitters with PSI between 20-40 and a delivery rate of 1-2 GPH. Because water pressure frequently varies, emitters should be pressure compensating so that water will be delivered at the same rate. Some emitters will have built in check valves to avoid dirt and debris from being pulled back into the tubing or pipe when the system shuts down. Emitters with built in check valves are a real advantage when the outlet of the emitter is buried under ground.
Inline Drip Tubing
Inline drip tubing is poly pipe with emitters installed directly in the pipe at uniformly spaced intervals between the emitters. Inline drip tubing can range from ¼” in size to ½” in size. Emitter spacing in ¼” inline tubing is usually six (6) to 12 inches apart. In ½” inline tubing the emitter spacing is usually 12 inches, 18 inches, or 24 inches apart. The output of the emitters for inline tubing can range from 0.25 GPH to 1.00 GPH. The emitters can be pressure compensating or non-pressure compensating. If the inline tubing is going to be installed for less than 50 feet, non-pressure compensating emitters are adequate. For inline tubing that will be installed longer than 50 feet, pressure compensating emitters are recommended. Be careful if using any tubing that has laser holes or porous pipe as they tend to clog easy and will not have an even distribution of water from the beginning of the pipe to the end.
Drip Tubing
Drip tubing delivers water to the laterals. Two sizes are typically used, ½ inch and ¼ inch. When purchasing tubing, use the same manufacturer’s pipes and fittings because size may vary from one manufacturer to another.
Drip Laterals
Drip laterals consist of either polyethylene drip tubing, flexible PVC tubing or PVC pipe. They supply water to the drip emitters. See picture to the right for an example.
120 gallons per hour divided by 60 minutes = 2 gallons per minute
How do you know how much water your drip irrigation system may be delivering? It depends on the type of emitters installed. For example, let’s say you have 120 one-gallon-per-hour emitters. This would equal an irrigation rate of two gallons per minute.
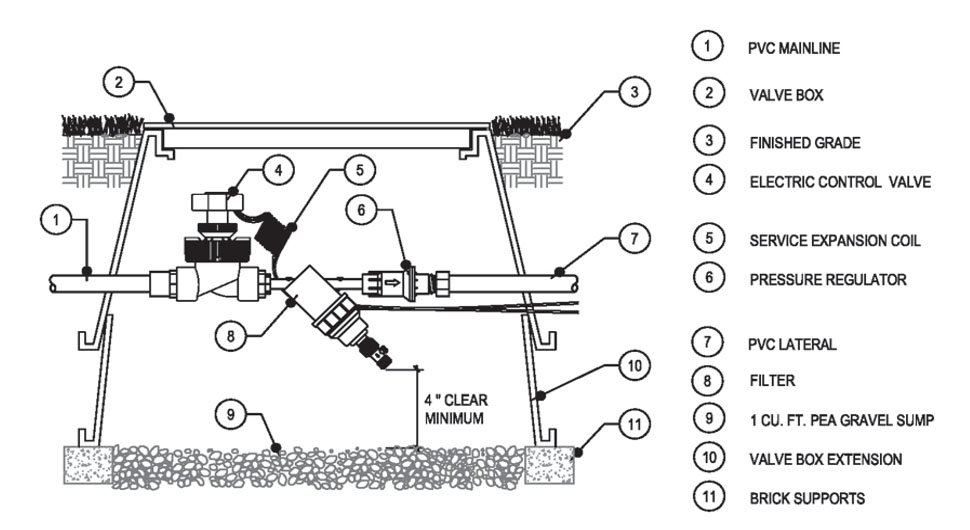
Control Valves
Valves control the flow of water to the irrigation lines. Electric or manually operated valves open and close to allow water to flow to separate irrigation zones within your landscape.
Electric control valves are operated by an irrigation controller (clock) that can be programmed with specific times and cycle durations. When using an electric clock, check the manufacturer’s specifications to ensure the valve will operate at the flow conditions for that station. If flow conditions are below the manufacturer’s recommendations, the valve may work at first but can fail prematurely (2 to 5 years) instead of lasting 10 or more years.
Filters
The filter usually consists of a fine mesh screen that protects emitters from becoming clogged with dirt and debris. For most drip irrigation systems, a filter with a 150 mesh screen will be suitable. Drip systems using ½ GPH emitters perform better if a 200 mesh screen is used. It is recommended that filters are installed after the control valves and before the pressure regulators. Some filters may not hold up under the constant water pressure experienced before the control valve, but it is still the best place for them to protect the pressure regulator from potential dirt or debris clogs.
Water sources that contain sand or algae may require a different type of filtration. Check with your local drip irrigation supplier or the product manufacturer for products that will work best for your system.
Pressure Regulator
Most drip systems operate at a low pressure, usually between 20 and 40 PSI. The pressure regulator will maintain a constant pressure to the drip emitters.
Your home’s water source may vary in pressure and if the pressure is too high, your drip irrigation system can be damaged. The pressure regulator is recommended to be installed after the control valves and filters, and before the drip emitters. There can be multiple pressure regulators installed in a zone, especially on slopes or large zones to maintain a more constant pressure throughout. Like some electric control valves, pressure regulators may have specific flow rates. On slopes, the pressure regulator should be installed in the middle of the top third of the area being covered by the regulator.
Flush Valve
Flush Valves are installed at the ends of every lateral or drip tubing for routine flushing and cleaning of dirt and debris from the system. Flush valves can be manual or automatic. Emitters with built-in check valves should always have a manual flush valve at the end of every lateral.
Maintenance
Drip irrigation does require routine inspection and maintenance to remain efficient. Such maintenance, while similar to that needed for conventional irrigation systems, is relatively simple and requires a minimal time investment. Avoiding Common Problems With Drip Irrigation
With routine maintenance and sound planning you can avoid common problems associated with drip irrigation. Below is a discussion of some of those problems and how to plan for them.
Clogging Drip emitters may clog. With adequate filtration and a good maintenance program clogging can be reduced.
Restricted Root Development Proper placement of emitters means root growth will be uniform, expansive and healthy. Make sure to plan for mature plant size and install emitters to cover at least two-thirds the size of the adult plant’s canopy.
Rodents and Pets Although gophers tend to avoid wet soils, dogs and other animals may chew tubing and emitters. In areas where this could be a problem the use of rigid PVC pipe and protection for emitters, such as installing emitters that attach to PVC risers, may be necessary.
Heavy Traffic or Vandalism Polyethylene tubing or poly tubing on or near the surface in areas of heavy foot traffic or children’s play areas may be easily broken or disconnected. Systems constructed from rigid PVC pipe are sometimes better suited in these situations. In areas where vandalism may be prevalent bury the system at least six (6) inches deep with the outlet installed one inch above the surface.
The benefits far outweigh the few drawbacks of drip irrigation. With proper design, installation, maintenance and scheduling drip irrigation will provide a healthy, attractive and water efficient landscape.
Maintenance and Visual Checks
Regular visual checks will make up the bulk of your maintenance program. Keeping your eyes open for clogged emitters, leaks or other damage will allow you to catch problems before serious damage to your landscape occurs. Check all emitter outlets regularly for location and flow. Adjust, clean, or replace emitters as needed
Indicators
An obvious indicator of damage to your drip system is the appearance of the plants themselves. Failing plant health is often linked with improper watering. Drought stressed plants will show signs of wilting. Over irrigation can also result in a plant wilting because of drowning roots. Check the soil below a wilted plant for lack of water or overwatering. Make changes to your emitter layout or watering schedule accordingly.
Soil conditions also indicate irrigation problems. If the soil appears too wet, look for damaged tubing. Leaky fittings may also be the problem. If the soil appears too dry, look for clogged emitters or kinked tubing. A simple change in your watering schedule may be all that is needed to adjust the moisture level in the soil.
Flushing the System and Cleaning the Filters
Regular flushing and cleaning of filters maintains the system’s efficiency. Checking them at least once every two months is a good schedule to follow. Most filters will have some type of cap. Remove the cap. Flush some water through the filter, insuring that the actual filter stays in the filter body. Remove the filter and clean or replace it if it is damaged or cannot be cleaned. Replace the filter and cap.
Flushing the System Flushing the tubing lines should be done periodically, at a minimum of twice a year during spring and fall. Systems using water sources with sand and other large particles should be flushed more often in the summer when the efficiency of the system is most critical to plants. At least once a month during the summer time is recommended. Always flush the system after any repair of d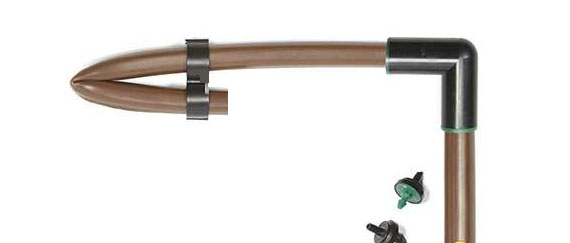 amaged lines.
To flush the system, remove the end caps and turn the valve on. Let the water run until it runs clear. Any dirt, debris or residue in the system should be expelled through the opened end cap. If the end cap can not be located find the last sprinkler or emitter in each line and open it to flush.
How much to water Queen Palms
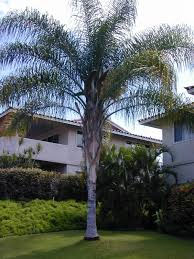
Queen Palms (Cocos plumosa)
Both Whitfield nursery and Moon Valley nursery recommend 25-30 gallons of water twice a week, in the summer, for mature Queen Palms. They should know! They both have been growing them for years.
How Much To Water Queen Palms In Arizona | (480) 969-8808
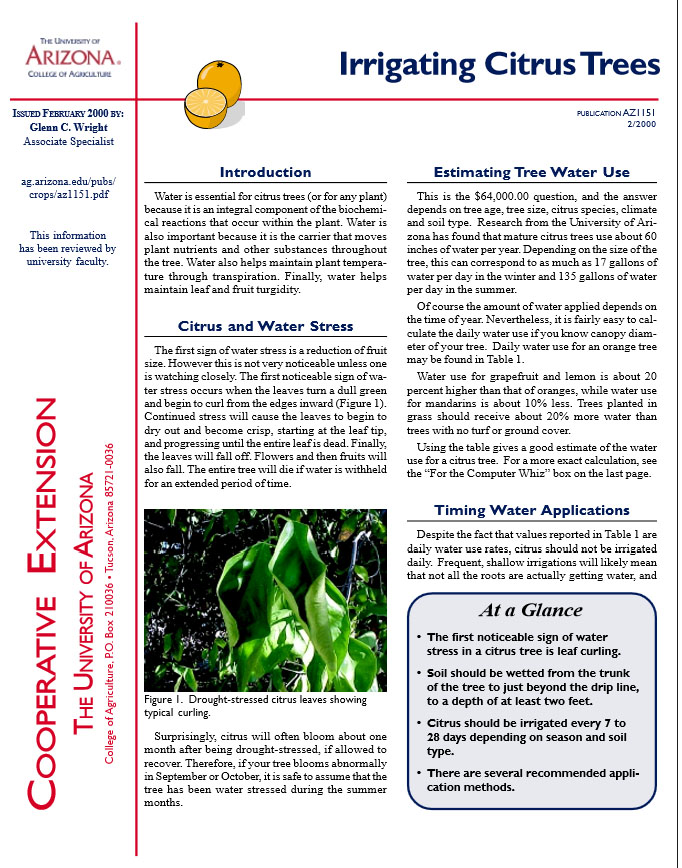
Watering Citrus Trees
Every thing you need to know about watering citrus trees can be found by downloading the PDF file to the left entitled Irrigating Citrus Trees
How Much To Water Citrus Trees In Arizona | (480) 969-8808
Landscape Watering By The Numbers
OK for all other trees and shrubs you can find pretty good information on how much to water by following this link. Landscape Watering By The Numbers Keep in mind that this manual is put out by the cities of Maricopa County, and there tax base is limited by the supply of available water – more water – more houses – more money for them to play with. So, in my opinion, these watering figures are a bit on the frugal side.
How Much To Water Trees In Arizona | (480) 969-8808
Warner's Tree Surgery is a family business that is now in its Third generation. Our business consists of my wife Pat, who manages the office and answers the phones, my Sons and Grandsons, and me - Warner Working.